This article provides a complete guide on How to Make Blurry Pictures Clear App Free, including why photos become blurry, how AI photo enhancement works, the best free apps and online tools, step-by-step methods, key features, benefits, limitations, real-world examples, expert tips, common mistakes, FAQs, and future trends.
Have you ever captured an important photo only to discover later that it looks blurry, pixelated, or out of focus? Whether it is an old family photograph, product image, social media post, travel picture, or memorable moment, poor image quality can make an otherwise valuable photo difficult to use.
Fortunately, you no longer need expensive photo-editing software or professional editing skills to fix many common image-quality problems. Today, several free and AI-powered photo enhancement apps can help reduce blur, improve sharpness, remove noise, enhance visible details, and upscale low-resolution pictures within a few simple steps.
You will also learn how tools like ChatGPT can help improve blurry photos by simply uploading an image and giving a clear editing prompt. Whether you are a beginner, blogger, digital marketer, photographer, content creator, or business owner, this guide will help you choose the right method for improving your pictures.

So, if you have a blurry photo that you are thinking about deleting, wait a moment—the right tool and technique may help you make it much clearer.
Let’s explore it together.
Table of Contents
What Does Making a Blurry Picture Clear Mean?
Making a blurry picture clear means improving its visible sharpness, detail, contrast, resolution, and overall visual quality with the help of image-processing or AI-powered enhancement technology.
Traditional photo editors mainly use sharpening filters. These filters increase contrast around the edges of objects, making them appear sharper.
Modern AI photo enhancer apps go much further.
They can analyse the content of an image, identify objects and faces, detect blur and noise, upscale low-resolution areas, and reconstruct or predict visual details.
In simple words:
Blurry Photo → Image Analysis → Blur Detection → Noise Reduction → Detail Enhancement → Sharpening/Upscaling → Clearer PhotoHowever, there is an important limitation.
An enhancement app cannot always recover the exact original information that was lost when the photograph became blurred. AI systems may sometimes reconstruct or predict details instead of genuinely recovering them.
Therefore, an enhanced photograph can look considerably clearer without necessarily becoming a perfect representation of details that were never captured by the camera.
Why Do Pictures Become Blurry?
Before learning how to make blurry pictures clear, you should understand why photographs become blurry.
Different types of blur require different solutions.
1. Camera Shake
Camera shake happens when your hand moves while taking a photograph.
It commonly occurs in:
- Low-light environments
- Night photography
- Indoor photography
- Slow shutter-speed situations
- Zoom photography
Even a small movement can produce visible blur.
2. Subject Movement
Sometimes the camera remains stable, but the subject moves.
For example, imagine photographing a running child or moving vehicle.
The moving subject may appear blurred even when the background remains sharp.
This is generally called motion blur.
3. Incorrect Focus
Your camera may focus on the background instead of the main subject.
For example:
- You photograph a person standing near a tree.
- The camera focuses on the tree.
- The tree becomes sharp, but the person’s face appears blurry.
- This is an out-of-focus image.
4. Low Image Resolution
A small image may look acceptable on a smartphone but become pixelated when enlarged.
For example:
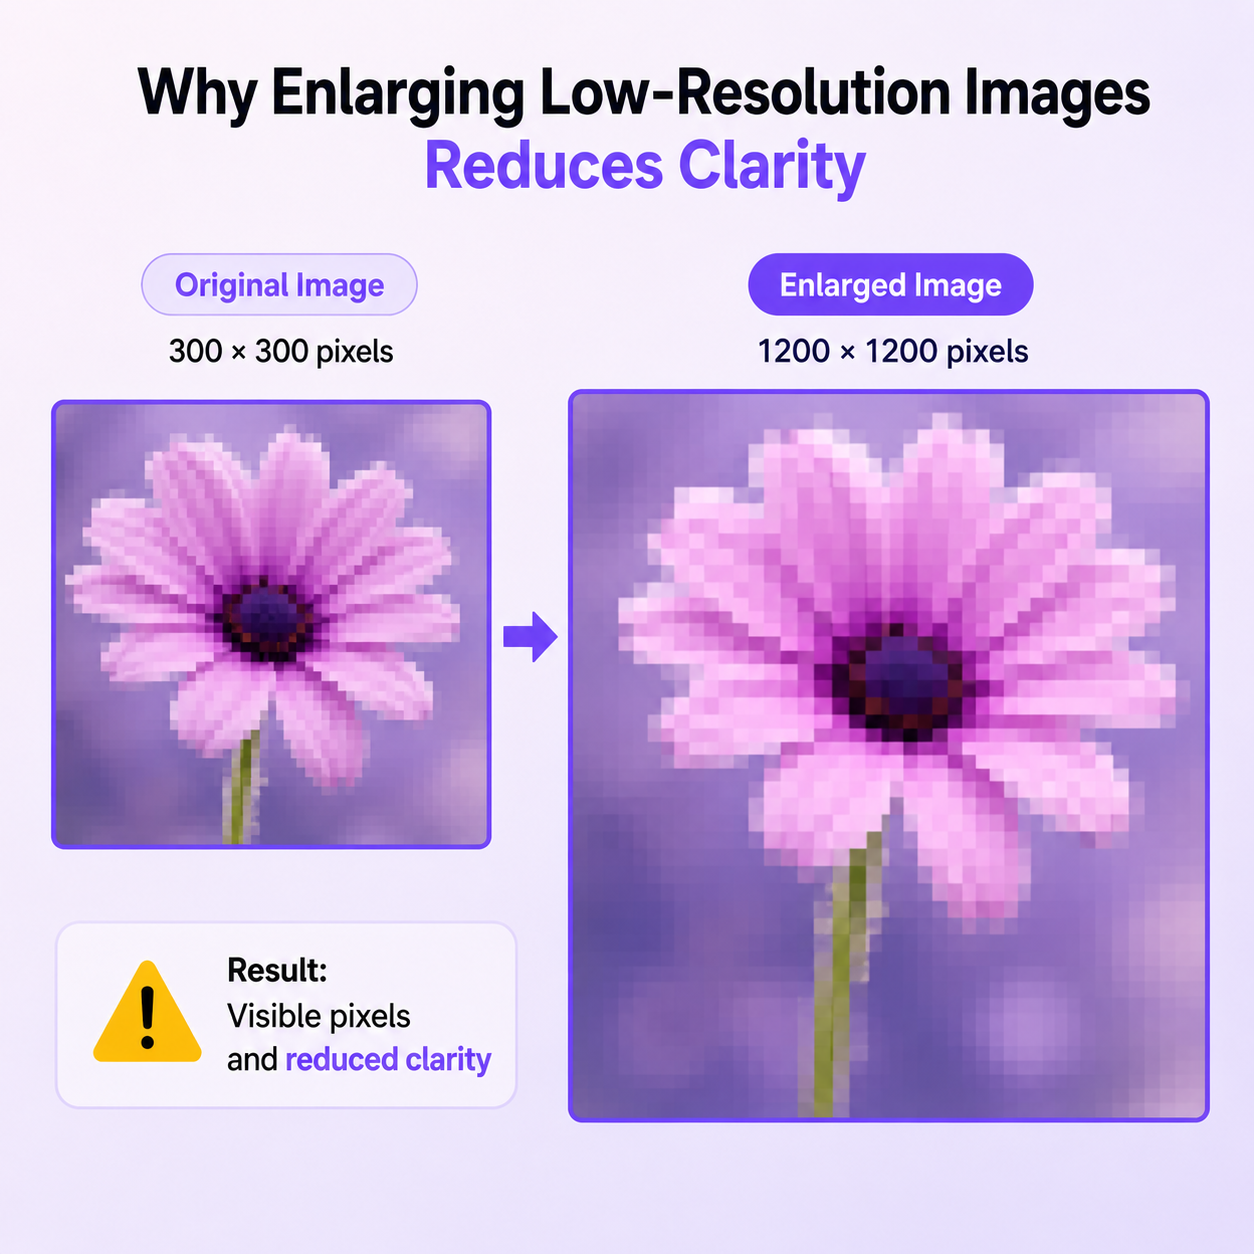
AI upscaling tools can sometimes improve such images.
5. Digital Zoom
Smartphones often use digital zoom after their optical zoom capabilities are exhausted.
Digital zoom essentially enlarges part of an image.
As a result, details may disappear and the picture can become soft or pixelated.
6. Poor Lighting
Low light forces cameras to compensate through ISO, shutter speed, computational processing, or a combination of these factors.
This can introduce:
- Noise
- Grain
- Motion blur
- Soft details
- Colour problems
7. Image Compression
Messaging and social media platforms may compress images to reduce their file size.
Repeated downloading, editing, uploading, and recompressing can progressively reduce picture quality.
Why Is It Important to Make Blurry Pictures Clear?
Image quality has become increasingly important because photographs are now used everywhere—from personal memories to digital marketing campaigns.
1. Better Personal Memories
Old family photographs are emotionally valuable.
AI enhancement can sometimes improve faded, grainy, pixelated, or mildly blurred photographs so they are easier to preserve digitally.
2. Better Social Media Content
Sharp images generally look more professional than poorly focused photographs.
Content creators can enhance images before using them for:
- Instagram posts
- Facebook posts
- YouTube thumbnails
- LinkedIn posts
- Pinterest graphics
3. Better Product Photography
An unclear product photograph can make an online listing look unprofessional.
Sharper product images can help customers examine:
- Product design
- Colours
- Materials
- Patterns
- Features
4. Better Blog Images
Bloggers frequently download, resize, crop, compress, and optimise images.
Sometimes these processes reduce visual quality.
Image-enhancement tools can help improve a weak source image before final optimisation.
5. Better Printing
Low-resolution photographs often look worse when printed at larger sizes.
Upscaling before printing may improve the perceived quality, although it cannot magically reproduce every missing original detail.
A Brief History of Image Sharpening and Photo Enhancement
Photo enhancement existed long before modern AI applications.
Traditional photographers used darkroom techniques to control exposure, contrast, brightness, and other visual characteristics.
Later, digital photography introduced software-based editing.
Applications such as professional desktop photo editors allowed photographers to manually adjust:
- Sharpness
- Contrast
- Exposure
- Highlights
- Shadows
- Noise
- Colour
- Saturation
Traditional sharpening algorithms primarily enhanced existing edges.
Then machine learning changed the industry.
Researchers began training neural networks on large collections of images to understand patterns associated with high-quality and degraded photographs.
Deep-learning research demonstrated that neural networks could perform sophisticated image enhancement and deblurring tasks rather than relying exclusively on conventional sharpening filters.
Today, consumer AI applications can perform operations that once required substantial editing knowledge.
How Does an AI App Make a Blurry Picture Clear?
AI image enhancement may look simple from the user’s perspective. You upload an image, tap Enhance, and receive a clearer version.Behind the interface, however, several processes may occur.
1. Image Upload
The user selects a blurry picture from the smartphone, computer, or cloud storage.
The application receives the image for processing.
2. Image Analysis
The system analyses characteristics such as:
- Resolution
- Noise
- Edges
- Faces
- Objects
- Colours
- Lighting
- Blur patterns
The exact analysis depends on the application.
3. Blur Detection
The algorithm determines which areas lack sharpness.
For example, it may identify:
- Facial blur
- Motion blur
- Background softness
- Pixelation
- Compression artefacts
4. Noise Reduction
Noise can appear as unwanted grain or random colour variations.
The application may apply denoising before or alongside sharpening.
Too much denoising, however, can make a photograph look unnaturally smooth.
5. Detail Enhancement
This is where modern AI tools differ substantially from simple sharpening filters.
Machine-learning models may infer plausible high-frequency details based on patterns learned during training.
For example, an AI system may recognise the structure of:
- Eyes
- Hair
- Skin
- Clothing
- Buildings
- Leaves
- Textures
It can then produce a visually enhanced reconstruction.
6. Sharpening
Sharpening increases perceived definition around edges.
It can make objects look more distinct.
But excessive sharpening may produce:
- White outlines
- Dark halos
- Rough skin
- Artificial textures
Therefore, balanced sharpening is important.
7. AI Upscaling
Some applications increase image resolution while attempting to preserve or reconstruct details.
For example:
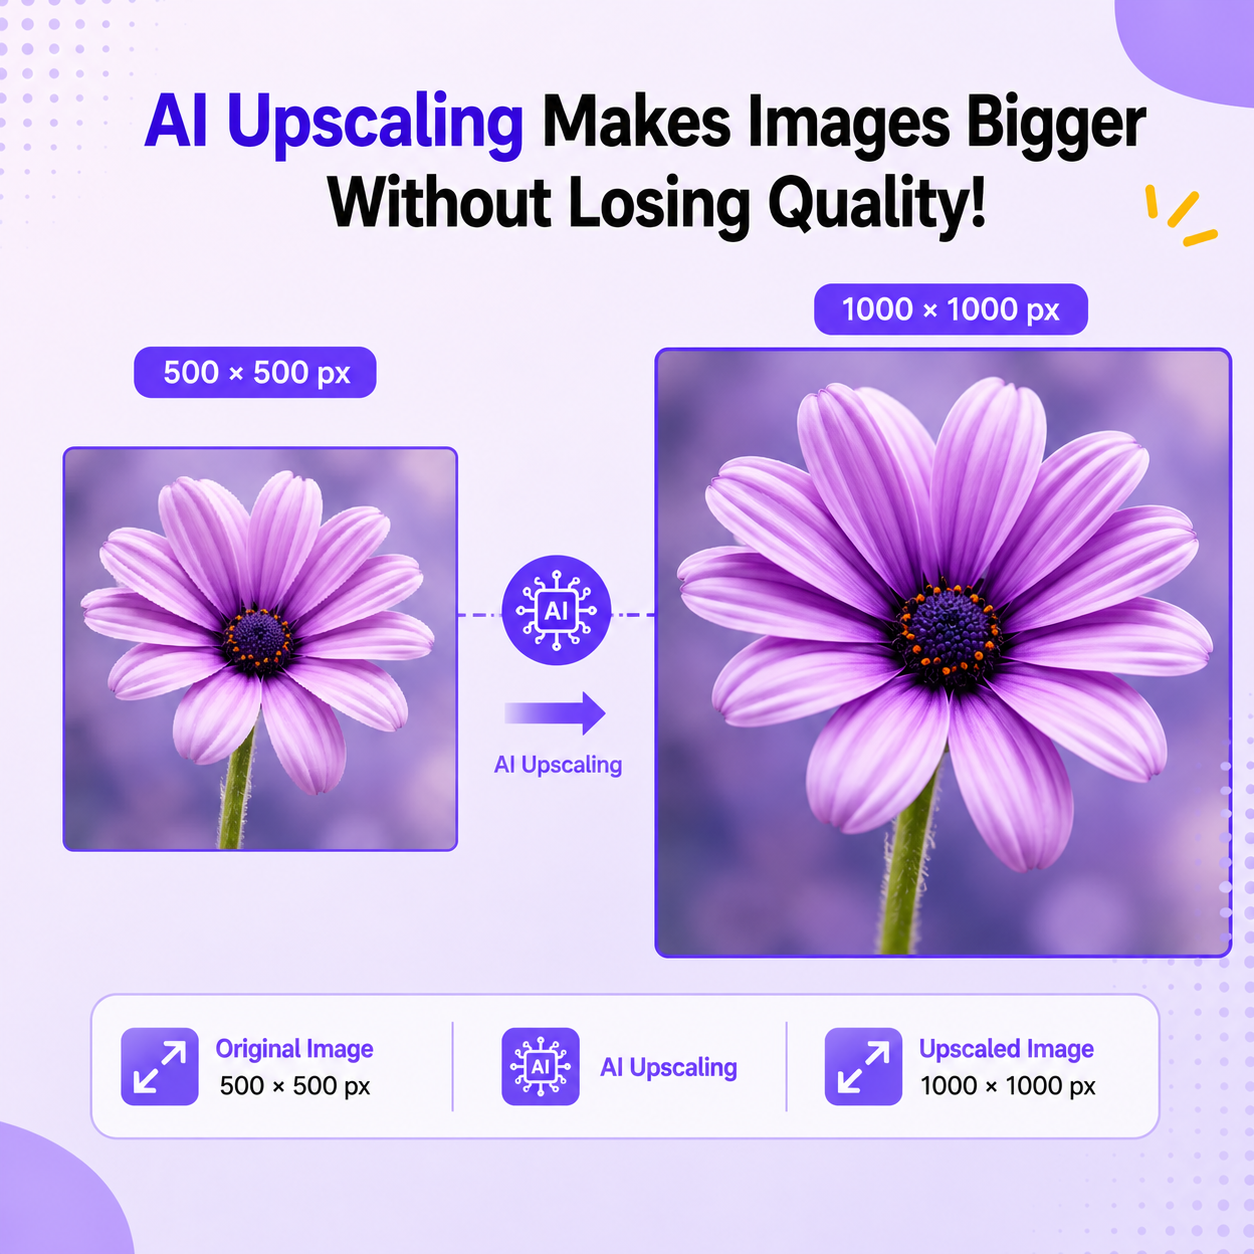
The result contains more pixels, although those additional pixels are partly generated through interpolation or AI reconstruction rather than captured by the original camera.
8. Export
Finally, the enhanced photograph can be exported as an image file.
For best quality, avoid unnecessary repeated compression.
How to Make Blurry Pictures Clear App Free
Here is a beginner-friendly process that works with most free photo-enhancement applications.
1. Choose the Best Original Photo
Always begin with the highest-quality original file available.
Avoid using:
- Screenshots of photographs
- WhatsApp-forwarded copies
- Heavily compressed versions
- Repeatedly downloaded social-media images
If the original camera file is available, use it.
2. Install or Open a Photo Enhancement App
Choose a trusted image-enhancement application.
Look for tools offering features such as:
- Sharpen
- Enhance
- AI Enhance
- Unblur
- Upscale
- Denoise
Some apps work on smartphones, while others operate directly through a web browser.
3. Upload Your Blurry Image
Open the application and select the photograph.
Allow the image to load completely.
4. Identify the Main Problem
Before applying random filters, determine what is actually wrong.
Ask:
- Is the photograph blurry?
- Is it pixelated?
- Is it noisy?
- Is it too dark?
- Is the face unclear?
Different problems require different adjustments.
5. Apply AI Enhancement
If your app provides an automatic AI enhancement feature, try it first.
Modern tools may automatically optimise:
- Sharpness
- Contrast
- Noise
- Resolution
- Facial details
Compare the enhanced version against the original.
6. Adjust Sharpness Manually
If the automatic result is too soft, slightly increase sharpness.
Do not push the slider to the maximum automatically.
Moderate sharpening usually looks more natural.
7. Reduce Noise
If sharpening makes grain more visible, apply light noise reduction.
A useful sequence is often:
Noise Reduction → Detail Enhancement → Moderate Sharpening8. Correct Brightness and Contrast
Sometimes a photograph appears unclear simply because it is underexposed.
Try small adjustments to:
- Exposure
- Brightness
- Contrast
- Highlights
- Shadows
9. Upscale When Necessary
If the image is very small, use an AI upscaler.
Upscaling is especially useful when preparing images for:
- Websites
- Presentations
- Posters
- Social media
- Printing
10. Compare Before and After
Zoom into important areas.
Check:
- Eyes
- Hair
- Text
- Object edges
- Skin
- Background
- Fine patterns
Make sure the AI has not introduced unnatural details.
11. Export at High Quality
Choose the highest practical export quality.
For photographs, high-quality JPEG is generally suitable.
PNG can be useful for graphics, screenshots, and images where lossless preservation matters.
Best Free Apps and Tools to Make Blurry Pictures Clear
Here are some of the best tools you can use to make blurry pictures clearer.
1. ChatGPT
Best for: Prompt-based photo enhancement, blurry images, old photos, product images, and beginners.
ChatGPT is one of the easiest options because you can upload your blurry photograph and explain the required changes in simple language. Instead of manually controlling sharpening, noise reduction, and other technical settings, you can tell ChatGPT how you want the image improved.
How to Make a Blurry Picture Clear Using ChatGPT?
- Open ChatGPT.
- Upload your blurry photograph.
- Enter a prompt describing the required improvement.
- Allow ChatGPT to edit the image.
- Compare the result with the original.
- If required, give another prompt for further improvement.
Here are some useful prompts:
General Blur Removal:
“Make this blurry photo clear and sharp. Reduce blur and noise, improve visible details and image quality, while keeping the original colours and composition natural.”Old Photo:
“Restore this old blurry photograph. Reduce blur, grain and noise, improve sharpness and contrast, and preserve its original appearance as much as possible.”Product Photo:
“Make this blurry product photo clear and professional. Improve sharpness, lighting and product details without changing its original shape, design or colours.”Natural Enhancement:
“Enhance this image naturally. Reduce blur and noise, improve clarity and sharpness, but avoid excessive sharpening or an artificial AI-edited appearance.”For better results, always upload the highest-quality original photograph available.
2. Remini
Best for: Blurry faces, portraits, old photographs, and low-resolution images.
Remini is a popular AI photo-enhancement tool designed to improve blurry, pixelated, grainy, and low-quality photographs. It is particularly useful for enhancing faces and restoring old family pictures.
The process is straightforward: upload the photograph, select the available enhancement option, allow the AI to process it, and compare the before-and-after versions.
Remini is especially useful when facial details are soft or the original photograph has relatively poor resolution. However, AI-restored facial details should always be compared with the original because heavily degraded images may require the system to reconstruct some details.
3. Adobe Express
Best for: General sharpening, blog images, social-media photos, and marketing graphics.
Adobe Express provides easy-to-use photo-adjustment features that can help improve slightly blurry photographs.
You can upload an image, access its adjustment tools, apply moderate sharpening, correct brightness or contrast when necessary, and export the improved photograph.
Adobe Express is a good choice when an image is only slightly soft and does not require aggressive AI restoration.
Expert Tip: Avoid applying maximum sharpening because excessive sharpening can create unnatural edges and make image noise more noticeable.
4. Canva
Best for: Bloggers, digital marketers, social-media graphics, thumbnails, and promotional designs.
Canva combines photo enhancement with a complete graphic-design environment. You can improve a photograph and immediately use it inside an Instagram post, YouTube thumbnail, blog banner, presentation, or marketing graphic.
Depending on the currently available features and plan, Canva provides tools for sharpening, adjusting photographs, and AI-powered image upscaling.
A typical workflow can be:
Upload Photo → Enhance/Upscale → Adjust → Add to Design → ExportThis makes Canva particularly convenient for content creators who want photo enhancement and graphic design in one platform.
5. Snapseed
Best for: Manual sharpening and natural-looking mobile photo editing.
Snapseed is useful when you prefer manual control instead of relying completely on automatic AI enhancement.
You can adjust details, sharpness, brightness, contrast, shadows, highlights, and several other aspects of an image directly from your smartphone.
Snapseed is especially useful for photographs that are only slightly blurry or soft.
For a natural result, gradually increase sharpness rather than applying aggressive adjustments.
6. Fotor
Best for: AI unblurring, automatic enhancement, and browser-based photo editing.
Fotor provides AI-powered tools designed to improve blurry and low-quality images. Depending on the image and available features, it can help with problems such as motion blur, defocus, noise, and poor resolution.
The basic process is simple:
Upload Image → Apply AI Enhancement → Compare Result → ExportFotor can be particularly convenient if you want an online solution without installing professional photo-editing software.
7. Picsart
Best for: Creative photo editing, social-media content, and AI-assisted enhancement.
Picsart combines photo enhancement with creative editing features.
After improving the quality of your blurry photograph, you can crop it, adjust colours, add text, apply effects, change backgrounds, and prepare it for social media.
This makes Picsart useful for creators who need more than simple blur reduction.
Some advanced AI features may require a paid plan, so check the current free-plan limitations before using them.
8. Pixlr
Best for: Browser-based sharpening and quick manual photo adjustments.
Pixlr is a useful option when you want to edit photographs directly through a web browser.
For mildly blurry photographs, you can use sharpening and other adjustment tools to improve perceived clarity.
A typical process is:
Upload → Adjust → Sharpen → Compare → ExportPixlr works best when the photograph already contains enough visible detail and mainly requires sharpening rather than heavy AI reconstruction.
9. Pixelcut
Best for: Product photographs, eCommerce images, and AI upscaling.
Pixelcut is particularly useful for online sellers and content creators.
If a product photograph looks blurry because it has a low resolution, AI upscaling can help create a larger and visually cleaner version.
It can be useful for:
- Product listings
- eCommerce stores
- Marketplace images
- Social-media graphics
- Promotional product visuals
10. Photoroom
Best for: Product photography, eCommerce, image enhancement, and upscaling.
Photoroom is another useful option for businesses and online sellers who need professional-looking product photographs.
Its image-enhancement tools can help improve resolution, sharpness, and overall image quality. It is particularly useful when a small product image looks pixelated or soft after being enlarged.
Along with enhancement, Photoroom also provides several tools designed around product photography and background editing.
Quick Comparison of Free Apps for Blurry Pictures
| Tool | Best For | Difficulty |
|---|---|---|
| ChatGPT | Prompt-based photo enhancement | Very Easy |
| Remini | Faces & old photos | Very Easy |
| Adobe Express | Basic sharpening | Easy |
| Canva | Design + enhancement | Very Easy |
| Snapseed | Manual enhancement | Medium |
| Fotor | AI unblur | Easy |
| Picsart | Creative enhancement | Easy |
| Pixlr | Browser sharpening | Easy |
| Pixelcut | Product photos | Easy |
| Photoroom | eCommerce images | Very Easy |
Key Features to Look for in a Free Image-Clearing App
Not every photo enhancer provides the same capabilities.
Here are the most useful features.
- AI Enhancement: One-click AI enhancement automatically analyzes and improves an image. This is particularly helpful for beginners.
- Image Sharpening: A sharpening control allows you to increase edge definition.
- Noise Reduction: Noise reduction helps clean grainy photographs.
- AI Upscaling: Upscaling increases the pixel dimensions of low-resolution images while attempting to maintain visual detail.
- Face Enhancement: Face-specific enhancement detects facial features and improves their perceived clarity.
- Colour Correction: Good enhancement software should provide control over Brightness, Exposure, Contrast, Saturation, Highlights, Shadows, and White balance.
- Before-and-After Comparison: A comparison view helps determine whether your changes actually improved the image.
- High-Resolution Export: An enhancement tool becomes much less useful if it significantly compresses the final file. Always check the available export resolution.
Benefits of Using Free Apps to Clear Blurry Pictures
Here are the major benefits of using free apps to make blurry pictures clearer and improve overall image quality.
- No Professional Editing Skills Required: Modern photo-enhancement applications are designed for ordinary users. In many cases, the workflow is simply: Upload → Enhance → Compare → Download
- Saves Time: Manual photo restoration can take considerable time. AI enhancement can produce an initial result within seconds or minutes.
- Cost-Effective: Free tools allow students, creators and small businesses to improve photographs without immediately purchasing professional software.
- Useful for Old Photographs: AI restoration can make faded or slightly damaged family photographs easier to view and preserve.
- Helpful for Content Creators: Creators frequently work with imperfect source images. Enhancement applications can prepare them for Thumbnails, Reels covers, Blog banners, Social posts, and Promotional graphics.
- Accessible on Smartphones: You no longer necessarily need a powerful computer for basic photo enhancement. Many tasks can be completed directly on Android or iPhone devices.
Challenges and Limitations of Making Blurry Pictures Clear
AI enhancement is powerful, but it is not magic. Understanding its limitations is extremely important.
1. Missing Information Cannot Always Be Recovered
Suppose a photograph is extremely blurred.
The camera never captured the person’s facial details properly.
An AI model may generate a plausible-looking face, but that does not mean every reconstructed detail is historically accurate.
This matters especially for:
- Evidence
- Identity verification
- Historical documentation
- Medical images
- Legal records
- Forensic material
AI-enhanced images should not automatically be treated as original evidence.
2. Excessive AI Enhancement Can Look Fake
Common problems include:
- Plastic-looking skin
- Artificial eyelashes
- Changed facial features
- Unrealistic hair
- Strange textures
- Excessive sharpness
Always inspect the result carefully.
3. Free Versions May Have Restrictions
Freemium applications may restrict:
- Number of enhancements
- Export resolution
- Premium AI models
- Batch processing
- Advanced tools
Pricing models can change, so check current terms.
4. Privacy Can Be a Concern
When you upload an image to a cloud-based enhancement service, the file may be processed on remote servers.
Avoid casually uploading highly sensitive photographs without understanding the service’s privacy policy and data-handling practices.
Real-World Examples of Making Blurry Pictures Clear
Here are some practical situations where photo-enhancement applications can be useful.
1. Old Family Photograph
Suppose you find a photograph from the 1990s.
It has:
- Grain
- Faded colours
- Soft facial details
- Low resolution
You scan it and run the digital copy through an AI restoration tool.
The application reduces grain, improves contrast and reconstructs some visible facial detail.
The enhanced photograph can then be archived alongside the untouched original.
2. Product Photo
An online seller takes a product photograph under poor lighting.
The image looks slightly soft.
Instead of immediately reshooting it, the seller may:
Correct exposure → Reduce noise → Add moderate sharpness → ExportIf the original is badly out of focus, however, taking a new photograph will usually produce a more authentic result.
3. YouTube Thumbnail
A creator captures a frame from a video.
Because video frames may be softer than dedicated photographs, the creator enhances the frame before placing it in the thumbnail.
This can improve visual clarity at thumbnail size.
4. Blog Image
A blogger has a small source photograph.
The image is:
600 × 400 pxbut needs to be displayed at a larger size.
An AI upscaler can create a larger version before final optimisation.
5. WhatsApp Photograph
Someone sends an important photograph through a compressed messaging workflow.
The downloaded image is softer than the original.
Enhancement can improve perceived sharpness, but obtaining the original uncompressed file is usually the better solution whenever possible.
Expert Tips to Make Blurry Pictures Clear Naturally
Getting a technically sharper image is easy.
Getting a natural-looking sharper image requires more care.
1. Start With the Original File
Every additional compression cycle may destroy information.
Always use the highest-quality version available.
2. Fix Noise Before Heavy Sharpening
Sharpening can make noise more visible.
Apply moderate denoising first when necessary.
3. Avoid 100% Sharpening
More sharpening does not automatically mean more clarity.
Excessive sharpening creates unnatural edges.
4. Compare Multiple Tools
One AI model may perform brilliantly on faces but poorly on landscapes.
Another may handle product images better.
Test two or three tools when the photograph is important.
5. Keep the Original
Never permanently replace an important original photograph with an AI-enhanced version.
Maintain:
Original Photoand
Enhanced Photoas separate files.
6. Inspect Faces Carefully
AI face enhancement can sometimes subtly change a person’s appearance.
Zoom in and compare it against the original.
7. Use Enhancement Before Final Compression
For website publishing, a practical workflow is:
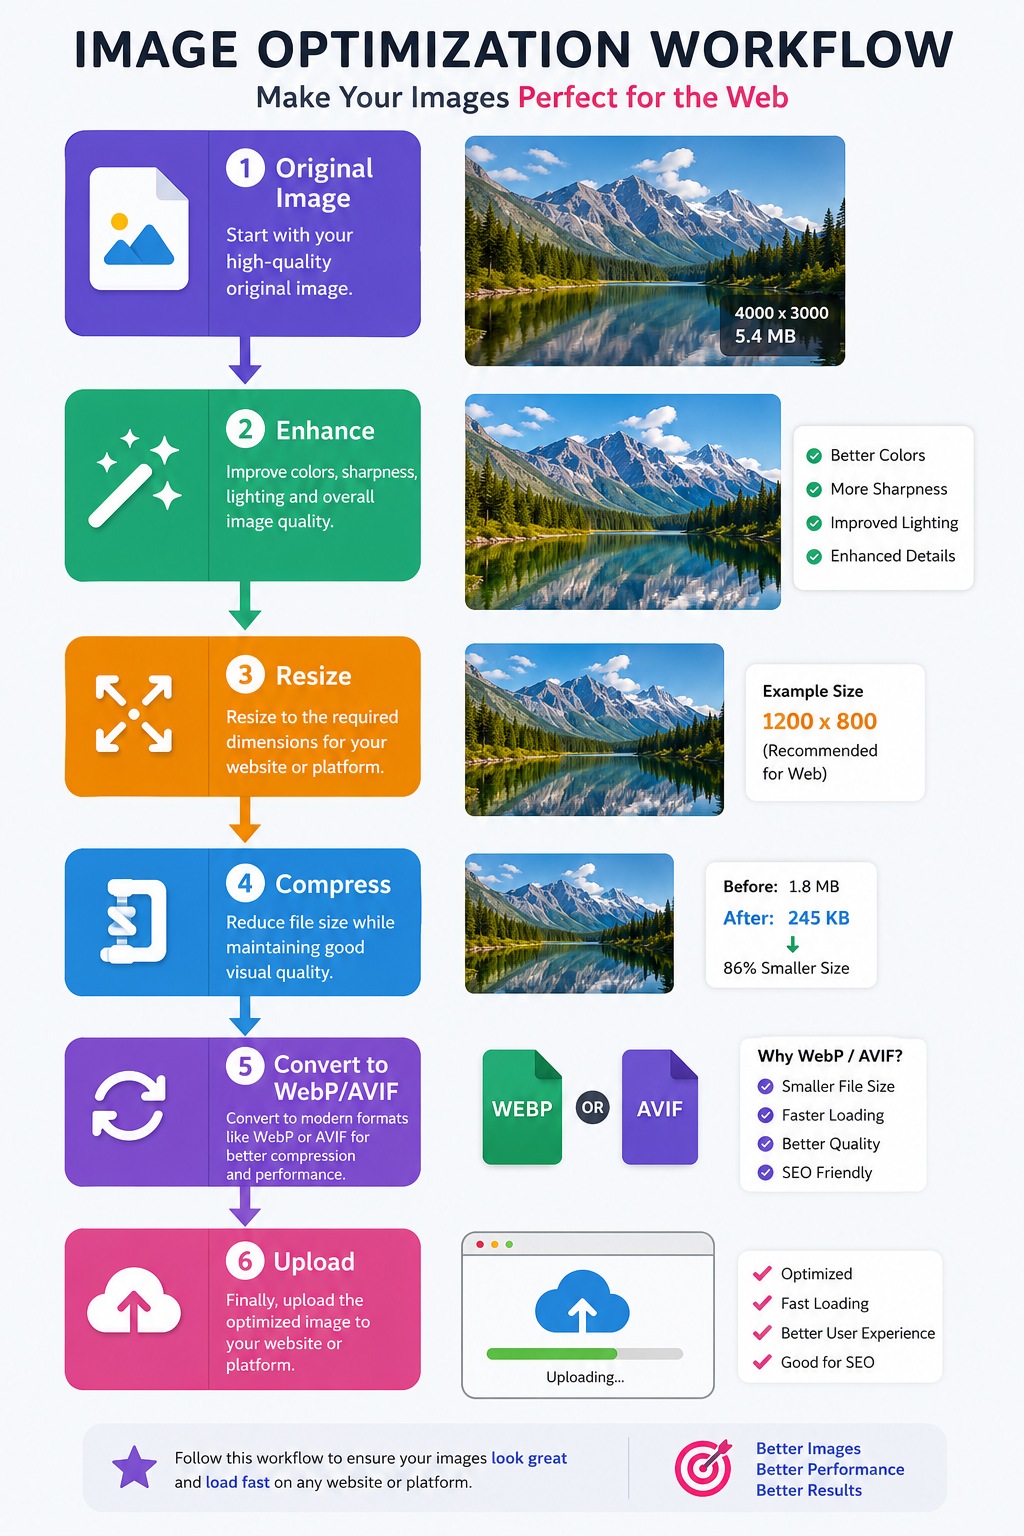
Repeatedly compressing the image before enhancement may reduce the information available to the enhancement model.
Common Mistakes When Trying to Clear Blurry Pictures
Here are a few common mistakes that can make a blurry picture look even worse instead of improving its quality.
- Applying Maximum Sharpness: This often produces halos and unnatural edges. Use sharpening carefully.
- Expecting AI to Recover Everything: AI enhancement cannot guarantee the reconstruction of information that the camera never captured.
- Enhancing Screenshots Instead of Originals: Always find the original photograph first whenever possible.
- Repeatedly Saving JPEG Files: Repeated JPEG compression can progressively reduce quality.
- Ignoring Image Resolution: Sharpening a tiny picture does not automatically make it suitable for a huge poster. Upscaling may also be required.
- Over-Smoothing Faces: Too much face enhancement can make people look artificial.
- Ignoring Privacy: Do not upload sensitive images to unfamiliar online tools without checking their privacy practices.
- Believing Every AI-Generated Detail Is Real: This is one of the most important mistakes to avoid. AI can produce visually plausible information. Plausible does not always mean historically accurate.
Traditional Sharpening vs AI Image Enhancement
| Factor | Traditional Sharpening | AI Enhancement |
|---|---|---|
| Edge improvement | Good | Good |
| Missing-detail reconstruction | Very limited | Possible |
| Face enhancement | Limited | Strong |
| Upscaling | Basic | Advanced |
| Automatic processing | Limited | Strong |
| Natural result | Depends on settings | Depends on the model |
| Risk of invented details | Low | Higher |
| Beginner friendliness | Medium | High |
Traditional sharpening is useful when an image already contains enough detail.
AI enhancement becomes more useful when dealing with low resolution, facial softness, noise or pixelation.
Can a Completely Blurry Picture Be Made Clear?
Not always.
This is the most important answer to understand.
If enough useful visual information remains in the image, enhancement software can often improve its perceived quality.
But consider an extremely blurred number plate.
If the original photograph does not contain enough information to distinguish the characters, an AI-generated “clear” number may represent the model’s prediction rather than the actual plate.
The same principle applies to faces, documents and other details.
Therefore:
Enhancement can improve visibility, but it cannot guarantee recovery of information that was never recorded.How to Prevent Blurry Pictures in the Future
Fixing blur is useful.
Preventing blur is better.
- Clean Your Camera Lens: Smartphone lenses easily collect fingerprints and dust. Clean the lens before taking important photographs.
- Use Better Lighting: Good lighting allows your camera to capture more information.
- Hold the Phone Steady: Use both hands when possible.
- Tap to Focus: Tap the main subject on your smartphone screen before taking the picture.
- Avoid Excessive Digital Zoom: Move physically closer to the subject when safe and practical.
- Use a Tripod: A tripod is particularly useful for Night photography, Product photography, Long exposures, and Group photographs.
- Take Multiple Shots: For important moments, capture several photographs. You can later choose the sharpest version.
How to Choose the Best Free App for Blurry Pictures
There is no single application that is perfect for every image.
Choose according to the problem.
1. For Old Family Photos
Look for:
- Face restoration
- Denoising
- Scratch repair
- AI upscaling
2. For Product Photos
Prioritise:
- Natural sharpening
- Colour correction
- Background tools
- High-resolution export
3. For Social Media
Look for:
- Enhancement
- Templates
- Resize presets
- Text tools
- Social-media export options
4. For Professional Photography
Prioritise:
- Manual controls
- RAW support
- Noise reduction
- Local adjustments
- Colour correction
FAQs:)
A. Use a free or freemium photo-enhancement tool that provides sharpening, AI enhancement, denoising or upscaling. Upload the highest-quality original image, apply moderate enhancement, compare the result and export it at high quality.
A. Tools such as Adobe Express, Canva, Remini and Snapseed provide different forms of image sharpening or enhancement. The best option depends on whether you are working with portraits, old photographs, product photos or general images.
A. AI can significantly improve some blurry photographs, but it cannot guarantee restoration of details that were never captured in the original image.
A. Yes. Many Android photo-editing and AI-enhancement applications provide sharpening, noise reduction and enhancement features.
A. Yes. You can use compatible photo-editing applications or browser-based enhancement services.
A. AI restoration and upscaling tools can increase resolution and improve perceived detail. However, generated details should not automatically be considered identical to the original scene.
A. No. Sharpness and resolution are different. Sharpening improves perceived edge definition. Upscaling increases pixel dimensions.
A. You may have applied too much sharpening. Excessive sharpening can amplify noise and create halos around edges.
A. It depends on the service and the type of photograph. Check the platform’s privacy policy before uploading sensitive personal or confidential images.
A. Slightly blurred text may become easier to read after enhancement. Severely blurred text cannot always be accurately recovered, and AI reconstruction should not be assumed to reproduce the original wording.
Conclusion:)
Making a blurry picture clear is no longer a complicated task that requires professional photo-editing skills or expensive software. With modern AI photo enhancers and free image-editing apps, anyone can improve photo sharpness, reduce noise, enhance visible details, upscale resolution, and give low-quality images a cleaner appearance within minutes.
Tools such as ChatGPT, Remini, Adobe Express, Canva, Snapseed, Fotor, Picsart, Pixlr, Pixelcut, and Photoroom provide different ways to improve blurry pictures. ChatGPT makes the process particularly simple because you can upload your photo and describe the required improvements through a natural-language prompt, while other tools offer automatic AI enhancement or manual editing controls.
However, always remember that photo enhancement and true detail recovery are not the same thing. AI can make an image look significantly clearer, but severely missing details may be reconstructed rather than accurately recovered. For important photographs, always preserve the original file and use AI enhancement on a separate copy.
“A blurry photo may lose its clarity, but with the right technology, it does not have to lose its value.” — Mr Rahman
As AI photo-enhancement technology continues to improve in 2026 and beyond, making blurry pictures clearer will become faster, smarter, and more accessible. So, before deleting a blurry photo, try one of the tools mentioned above—you may be surprised by how much clarity you can bring back.
Read also:)
Have you ever used an AI app to make a blurry picture clear? Share your favourite tool or experience in the comments below—we’d love to hear from you!